

Ever wondered if you could use alcohol inks on your gel plate? Well yes, you can!
Let me show you how easy it is to create super interesting backgrounds in a few super easy steps 🙂
And I have a gift for you to download so make sure to watch the video to find out how to get it!
If you’re loving the way colour and texture flow in this process, you might enjoy exploring my original paintings and handcrafted candles — each piece infused with the same joy of material, colour and calm you see in this gel printing process.
Start the video and follow me along!

From colour play to finished pieces
Many of my candles begin this way — with intuitive colour, movement, and experimentation. I first create an original painting inspired by processes like this, then use that artwork to illustrate the mood of a fragrance.
The result is a candle that starts as a visual piece, and becomes something you can feel in a space.
THE PROCESS
1. Drop and Move
The easiest way to use alcohol inks on a gel plate is what I like to call the “Drop and Move” technique. Sounds like it could be a dance move, don’t you think? 😊
It’s basically the same idea as working on yupo — drop the ink down, then make it move to create patterns.
It’s best to start with a limited palette, so I’m choosing just three colours: pink, turquoise, and lime (similar to the colour energy you see in my recent paintings). Pink + lime can go a bit muddy, but with alcohol inks I don’t mind it.
Steps:
• Add drops of your 3 colours around the gel plate (don’t try to cover it completely).
• Add a little blending solution now or later.
• Drop a 4th colour into a few gaps if you like — I’m using yellow because it works beautifully with these three.
• Use your ink blower to move the colours around, adding a little more blending solution as you go.
• Add more colour if you want — I’m just reusing the same turquoise so I don’t go too crazy.
Quick tip: A white sheet of paper under your gel plate makes it easier to see what you’re doing (it can make the plate slide a bit, so just be mindful).
If you get a patch you don’t love, or too much of one colour in an area, dab it with paper towel to lift or tone it down — then keep playing.
Once you’re happy, let everything air dry completely. No heat tool — just patience (I know… rude 😂).
When it’s completely dry to the touch, brayer on a thin layer of white paint. The wet paint will help pull the ink off your plate.

2. Hold on!
Alcohol inks grip a lot more than regular acrylic paint, so I’m using 200gsm cardstock to make sure the paper doesn’t rip. I definitely wouldn’t try this with copy paper.
Steps:
• Place your paper on top of the wet white paint.
• Burnish the whole surface with your hand or brayer.
• If you want really even pressure — or if your hands get sore — you can use a baren (it’s a great little tool for gel printing and card making, and I’ve added it to the supplies list below).
Now gently pull your paper off and take your time. Don’t worry if there’s some residue left behind — that’s completely normal.
And now… look at those colours, the fun patterns, and that beautiful little sheen from the inks!
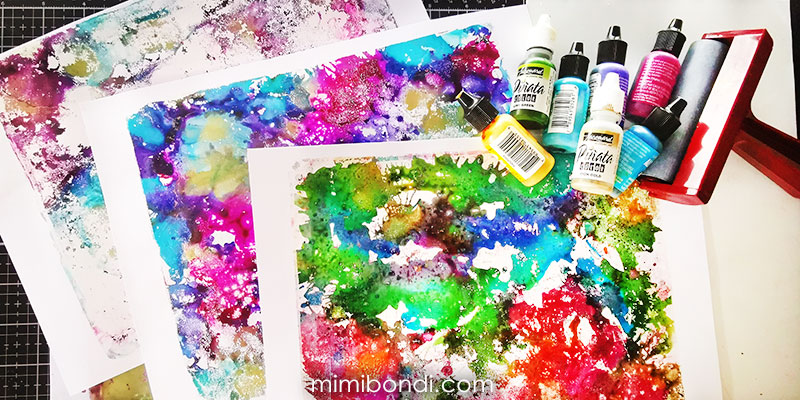
This time I’m starting with two shades of purple and some pink. I’ll also add a little gold mixative and some turquoise.
Mixatives are much more dense than regular alcohol inks, so after dropping them onto your gel plate, make sure to add a little blending solution straight away. This helps the particles break up and spread. The more you can make the mixative move, the prettier and more organic it will look — otherwise you can end up with heavy patches that don’t blend as nicely.
3. Your turn!
If, like me, you still have lots of residue left on your gel plate, go ahead and pull another print — the second pulls are often just as interesting.
I hope this quick introduction has inspired you to give it a go. And if you’re worried about alcohol inks staining your gel plate — don’t be. They won’t. So now you really have no excuse not to try it 😊
And if you’re not sure what to do with these crazy colourful backgrounds you’ve just created, you might find inspiration in how I use colour and texture in finished paintings.
With love and sunshine,
Mimi Bondi
A little creative gift for you

It’s a high resolution PDF file you can print and use in your own artwork! It’s the one I created in this video, but reworked to make it even prettier!
You could use it as a background for cards or a journal page, or tear it up for collage, or just frame it!
To get it for free:
- Watch the video
- Add the file to your cart here
- Enter the code on the screen at checkout
- Enjoy 🙂
If you’d like to try this yourself, here’s what I used:
LIST OF SUPPLIES
- Gel Press Gel Plate 8×10 in
- Tim Holtz Alcohol Ink: Wild Plum, Aquamarine, Lemonade, Amethyst, Cool Peri
- Pinata Alcohol Ink: Lime Green, Pink, Gold
- Ranger Blending Solution
- Alcohol Ink Air Blower
- Brayer (you can also use a baren if it helps – see it here)
- 200gsm white cardstock
- Liquitex Basics Acrylic Paint: Titatium White

Hi Mimi, love your videos, loved the use of alcohol ink on the gelli plate, i will definitely give that technique a go to produce beautiful backgrounds as well. Thanks for sharing!
Hey Sue, such a lovely message for me to read today, so glad you got inspired to give it a try! Let me know how it goes for you 🙂 xx mimi
Hi Mimi, thanks for the pdf download. I watched the video just to find out what a gelli plate is and how it works but it seems the plate goes with a whole lot of supplies which I don’t already have such as alcohol inks and blending solution. Pls kindly advise if I could use acrylic / watercolour and is this the only way to make my own journal backgrounds? Tks,
Rosa
Hi Rosa, Glad you enjoyed the video and the gift 🙂 You can use a gel plate with acrylic paint (it’s it’s main purpose actually!). And there are TONS of ways to make your own art journal backgrounds. I use so many techniques I created an e-course just for backgrounds right here: https://mimibondi.com/mixed-media-playground-1-e-course. The e-course also includes 5 full length (step by step) video tutorials (much more details than my free youtube videos) so I think it would be perfect for you Rosa! Let me know if you have any questions about it 🙂
Great technique and fun too!
Hi Alice!! Thank you, and super easy too! There are many other techniques and I’ll demonstrate them in upcoming videos 😉